10.1 Maintenance and service
The prerequisite for a long trouble-free operation is a regular cleaning of the bonding outlet. Remove several times a day the particles (tin, colophony, etc.) in the bonding outlet. Use a slight air jet, a cotton bud if necessary. Also provide a weekly drop of fine synthetic oil (known as sewing machine oil) in the bonding outlet.
Cleaning instruction for the LKV-12/LKV-S8 model series

If the cable clamping device does not operate correctly, please proceed as follows:
- Unscrew the plastic screw 9.
- Unscrew the threaded pin 26 using the Allen wrench 1,5 (approx. 7 turns) until the bolt bounces back.
- Push back the clamping piston 6.
- It is now possible to remove the control valve14 with the pressure spring 1 to the top.
Caution:
Do not replace or exchange the control valve, the case and the control valve are adjusted to the micron!
- Clean and slightly oil the control valve 14 and the bore BO (only use pneumatic oil).
Functional test:
The control valve must be easy to be inserted from the bore bottom side BO! - During assembly, insert the control valve from the top and press it to the bottom, then insert the shut-off piston 22 and screw in the threaded pin 26 and the PA screw 9.
-
During use:
An occasional small drop of pneumatic oil into the locking bore ensures trouble-free operation. An “excess” leads to damage.
Possible source of error:
- Contaminated compressed air (observe the notice!)
- Contamination of clamping outlet (cleaning!)
- Interchanging the control valve 14 (observe the notice!)
- Wrong sealling 17! The felt seal must not be replaced by other types of seals.
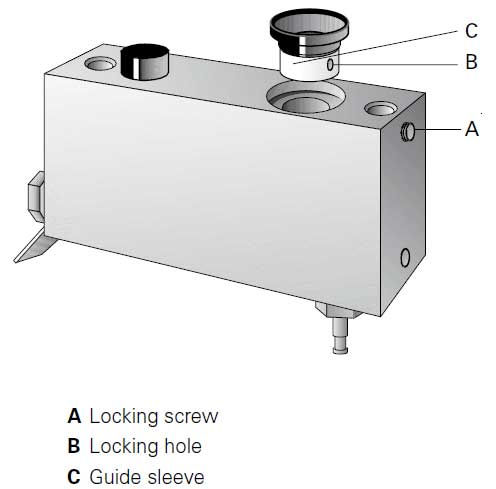
10.2 Maintenance instructions for special module LKV-12 with guide sleeve
A change in design was made for easier cleaning in the area of the locating hole / control valve.
For cleaning, unscrew locking screw A until the guide sleeve incl. funnel can be removed to the top. Clean and slightly oil the locating hole and the control valve. Only use pneumatic oil. Caution! An “excess” leads to damage.
During assembly, make sure that the locking screw A locks the guide sleeve C in the precise position using bore B. Otherwise, there is a risk of damage to the bonding or needle piston.
Caution!
Do not replace or interchange the control valve.
The case and the control valve are adjusted to the micron.
10.3 Maintenance and service
Instruction for replacing the clamping piston for bonding module TYPE LKT
If the needle or pin does no longer make proper contact due to wear or damage, please proceed as follows to replace it!
– Unscrew the threaded pin 1 using the hexagon screwdriver (Allen wrench 1.5) (approx. 7 turns) until the bolt bounces back.
– Pull cap 2 from pressure rod upwards.
– Remove compressed air connection 3
– Slide out pressure rod 4 towards the bottom
– Pull out plug 5 (possibly using the plastic screw)
– Remove piston 7 together with pressure spring 6
Note
If there are any problems when removing the clamping piston, please blow carefully compressed air into the bonding outlet
– Replace piston 7 with the sealing lip
Reassemble in reverse order

10.4 IMPORTANT
Prior to commissioning
The prerequisite for a trouble-free operation of the bonding is a clean and oil-free compressed air supply!
Using a microfilter (better than 99%) as well as a water or oil separator is a condition.
Important Safety Note!
Our products are tools for bonding electric conductors in testing, checking and measuring equipment. If this equipment is operated outside low safety voltages (up to max. 42V and mains
isolation), it may only be used in systems used for this purpose and be operated by qualified personnel in accordance with the recognized rules and regulations of electrical engineering. Handling
and operating the bonding modules and bonding units is only allowed if the system has been reliably switched off.
Before switching on, sufficient protection of the personnel has to be ensured. Please observe: The wires bonded in the modules are energized. Improper use may result in fatal electric shock.
Maintenance and service
The prerequisite for a long, trouble-free operation is a regular cleaning of the bonding outlet.
Remove several times a day the particles (tin, colophony, etc.) in the bonding outlet. Use a slight air jet, a cotton bud if necessary.
In addition, occasionally add a drop of synthetic lubricant with teflon into the bonding outlet.
A suitable oil can be purchased with our service kit.
Declaration concerning CE marking
Systems that are incomplete machines fall under the scope of the EC Machinery Directive (2006/42/EC). They are not provided with the CE mark. A declaration of incorporation and assembly instructions are provided for them.
The pneumatic components in the version supplied by us are intended for installation in a machine.
Their commissioning is prohibited until it has been determined that the machine in which our cable contacting modules are to be installed complies with the provisions of the EC Machinery Directive.
RAWE Datentechnik Prüftechnik GmbH, Stromeyerstrasse 39, 88171 Weiler-Simmerberg/Germany
Our maintenance instructions including installation instructions are provided with every delivery and, are also available on our homepage: www.rawe-testcomp.de